A correct installation of the wall safe is most important to grant the safety of this product.
Before walling the safe, check its correct operation by opening and closing the door (see attached instructions)
The safe shall be walled with the door opening from left to right (the hinge shall be on the right), IT SHALL NEVER BE upside-down. Moreover it SHALL NEVER BE walled on the floor. The guarantee expires in case these provisions are not kept.
The safe shall be walled keeping its front part 2 cm inside the wall line.
1. We recommend to install the safe in a secluded place, where it is difficult to use big tools (such as hammers, crowbars, picks, breakingtools, and so on.), but at the same time it shall allow the user to use easily the control devices on the door.
2. Choose a wall at least 10/15 cm deeper than the safe itself, avoiding walls subject to condensate, in order not to damage the lock inner devices.
 3. Cut out an opening in the wall about 20 cm larger and higher than the safe front part, and 5/6 cm deeper.
4. Wet the internal surface of the wall cut out
5. Protect properly the front surface with a nylon film, to avoid damages to the control devices on the door
6. In order to increase the anchorage of the safe in the wall, we recommend to wrap the same using a welded net with 30 mm meshes, positioned about 30 mm from the 4 side walls of the safe. As an alternative, you can also use rod irons with 10 mm diameter to be located on the tearing proof fins on the rear of the safe. At the end, if you think that some suspicious people might reach the rear of the safe by opening the rear wall, it would be better to place on the rear wall of the cut out a rod iron net with 6 mm diameter and about 5 cm meshes.
7. Place the safe inside the opening (with the door opening from left to right, that is with the hinge of the right side), keeping its front part 2 cm inside the wall line.
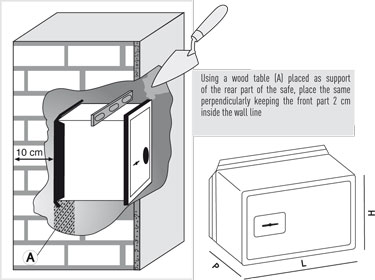 8. By means of a wood table cover the safe front part, leaving a gap to be filled with concrete.
9. Wall the safe using a high strength cement mixture consisting in cement type CEM II/A-LL 42,5 R (UNI EN 197-1) and sand, carefully filling the exceeding space on the side and on the bottom of the safe. Do not use too much water. The use of quick-drying cement is unadvisable.
10. As soon as the mixture has hardened and after carrying out trimming, if necessary, remove the protections of the front and open the door, keeping it open at least 5 days so as to remove the humidity remains due to the walling operations.
11. Pay attention that water, cement or varnish do not enter the safe through the door perimeter, the lock or the other control devices during walling or wall painting. This is much more important if the safe is provided with an electronic lock or a sequence switch deviceHits: 3654
Author: Лука Сейфы
Date: Sunday, 01 November 2009


Structurally made thus: a door from the alloyed steel thickness of 10 mm, the case from steel thickness of 2 mm. Has a lock with electronical code. Digital Electronic Combination.


